Thursday, October 3, 2013

October Maintenance to Prepare Your Home for Winter

With the recent brush of summer weather, it's hard to believe that winter is right around the corner. Take advantage of the warmer weather and the daylight hours to make sure your home is prepared for winter by performing some routine maintenance now. These are A&E's tips for October Home Maintenance. 

Furnace:

Have your furnace tuned and cleaned. You should replace furnace filters roughly every 2 months. Dirty filters can increase energy use and restrict airflow so replacing filters will help you save on heating costs. Always be sure to keep extra filters on hand for the winter months.

Plumbing and Drains:

Drain garden hoses and shut off water to outside faucets in order to protect your pipes. Insulate any water lines that run along exterior walls to help you avoid a frozen pipe burst. 

Windows and Doors

Ill-fitting windows can cause drafts and lead to hot air escaping in the winter. Caulk and weather-strip around windows and doors to reduce energy loss and keep heat in your home. 

Consider replacing any windows that have broken panes or sashes that don’t shut properly and install storm windows if you own them.  We recommend Andersen low-E windows. These low-emittance (low-E) glass windows block a significant amount of radiant heat transfer which ultimately reduces the total heat flow through the window.

Install door sweeps on the inside of exterior doors as well as on the interior doors to an unfinished basement or attic.

Roofing and Siding

If you have asphalt shingles, it's a good idea to repair shingles on a warm day so that the shingles will be flexible. Look around your house for damaged paint, warped wood, or cracks and holes.  Depending on the siding you have, the repair will be different, but most types require a coating of sealant or primer, and paint to finish. 

Gutters:

For proper drainage of snow and rain, it is important to clean out your gutters now and install gutter guards so that melting snow and ice will flow freely.  

This will help prevent ice damming, which occurs when water freezes and seeps into the home, causing damage to ceilings and walls. Make sure downspouts are carrying water away from the house’s foundation to avoid flooding.

Trees and Brush:

Trim trees and remove dead branches that hang close or are in contact with your house. Brush close to your house serves as a common access point for insects and rot.  

Additionally, ice, snow, and severe wind can weaken trees and break branches off, potentially damaging the exterior of your home and your car. 

Keep surfaces leaf-free and store your outdoor furniture and planters. Leaf prints can leave imprints on your deck and concrete surfaces that can be hard to remove. Store outdoor furnishings so that they will last longer, and not be exposed to extreme cold or wet weather.

Pennington Fireplace
Smoke Detectors and Carbon Monoxide Alarms:

Test your smoke detectors and carbon monoxide alarms and check the age of these devices.  We recommend replacing batteries or even the entire unit if it’s older than 5 years.  

Install a carbon monoxide detector on every floor in your home, especially if you heat your home with wood heat or a gas heater.  Also make sure fire extinguishers are in good working order. 

Fireplace:

Clean out your fireplace and cap or screen the top of the chimney to keep animals out.  Inspect the damper to see if it’s in good working condition for proper opening and closing.

And Remember....


Wednesday, September 25, 2013

Happy Fall & Welcome Back Tollgaters!


Hello Everyone and Happy Fall! We're wishing all of the local school students a happy and healthy start to the new school year.  We also want to congratulate Tim Hansen, a local Boy Scout and Hopewell resident who participated in the Urban Promise Project and worked with his Boy Scout troop to update a children's liturgy room at the local Pennington Unitarian Church.   
  
Tim and the Boy Scouts repainted the walls, installed new flooring, and installed a new door to close off and secure a corridor.  A&E and Aromaz Mercer Carpet provided supplies and assistance to the troop.  
 
Tollgate Alligator Monument
As the leaves begin to change colors and kids are getting back into the swing of things with school, we at A&E Construction are looking forward to the change of the seasons. This year, Tollgaters will have a new addition to their school with the Tollgate alligator mascot sitting atop the school's rock monument!
 

Keep up with A&E's spotlights on the community by liking us on Facebook or following us on Twitter!


Tuesday, August 6, 2013

A Remodeling Challenge: Princeton, NJ

In the final week of June, A&E took on a unique challenge: start and finish the remodeling of a Princeton Kitchen and Master Suite in under 6 weeks, including the acquisition of municipal permits and the installation of a structural beam. But there was more: the homeowners were moving from out-of-state and would be unable to make design selections in person, so we would be advising them on design choices via email and through computer renderings, site unseen.
 
Now, 5 1/2 weeks later, we are proud to present you with the finished project that we successfully started and completed in just over 1 month! Today, we're going to share with you everything undertaken in these short 6 weeks - from initial reconfiguration of the floor plans to installation of the final fixtures!
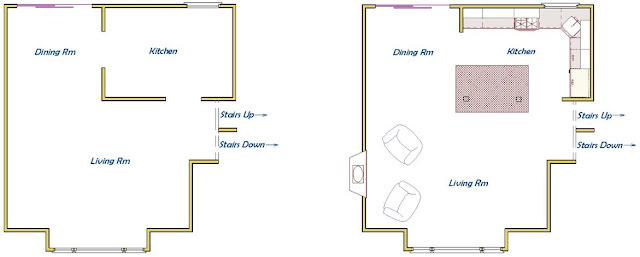
In the kitchen, the homeowners wanted to open up the floor plan to merge the kitchen, dining room and living room and create room for an island. They also wanted to reuse some of the existing cabinets and install new ones to match, while introducing new granite countertops, tile backsplash and hardwood flooring.
Kitchen Floor Plan: Initial (left) and Proposed (right)

 
In the master suite, the homeowners wanted to create a more cohesive 3-room unit by shrinking the nursery and converting it to a walk-in closet and enlarging the bathroom and moving its entryway from the hallway to the master bedroom. The newly-converted walk-in closet would be complete with floor-to-ceiling shelving, the master bedroom would have new window seats with storage drawers underneath, and the enlarged bathroom would have a new toilet, freestanding bathtub, vanity with double sink and large shower with a glass door installed.
 
Master Suite: Initial (left) and Proposed (right)


Because we were communicating with the homeowners via email, it was extremely important that our renderings accurately depicted the appearance of the space - from the color of the shower tile, to the pendant lights over the kitchen island, and everything in between! Here's a glimpse of how design choices were facilitated through the use of drawings:
 
Kitchen Renderings: Choice of Backsplash Tile and Paint Color
Brown glass backsplash tiles were substituted for olive-green tiles that accentuated the colors in the Solarius granite countertop, while the pastel blue of the walls was changed to a light gray-green hue that matched the granite, newly chosen backsplash and cabinetry.


Master Bath: Elevations and Perspective
 
In the master bath, the drawings were especially helpful in choosing the accent tiles in the shower and the paint color. A bright blue glass tile was substituted for a lighter sea-glass green, and a complimentary light aqua on the walls replaced the beige.  
 
 
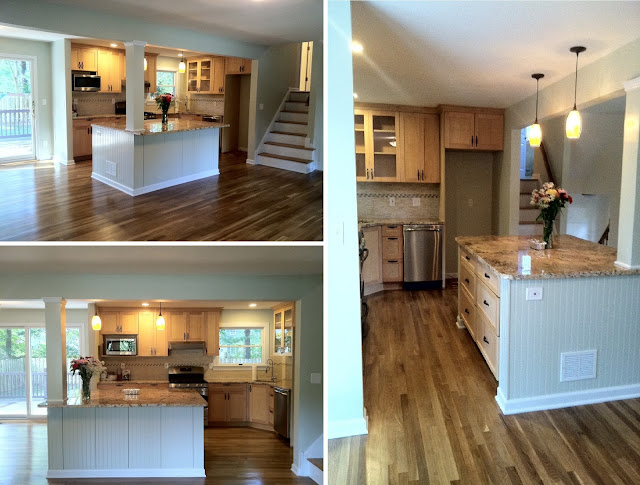
After using these drawings to confirm design selections with the homeowners, we were able to move from demolition, framing and sheetrocking to flooring, painting, installation of various fixtures, and the addition of the finishing touches! Here's how this Princeton Kitchen and Master Suite completed:  
Kitchen: Before (top), Final Rendering (middle) and After (bottom)


Master Bath: Before (top), Final Rendering (middle) and After (bottom)


And a glimpse of the master bedroom's walk-in closet:
 
We're so excited to share this exhilarating 6-week journey with you! We hope you enjoyed it, too!
And a very special thank you to all of A&E's employees and subcontractors, without whom we would have been unable to complete this project!

Monday, August 5, 2013

Princeton Basement: The Final Result!

Over the last month, we've shared with you the major stages in the renovation of the Princeton Basement: framing, sheetrocking, spackling, painting and ceiling installation. Now, we're excited to share with you the finishing touches and final result: with carpet, flooring and cabinetry in place - the Princeton Basement is officially complete!


A View From the Stairs


The Laundry Area: New Flooring


 The Laundry Area: New Cabinets


A Closer Look at the New Cabinetry


A Look Back at the Stairs

 
 The Before/After!


Now, there's plenty of room for activities and entertainment!


Tuesday, July 30, 2013

Princeton Basement: Painting and Ceiling Installation

Last week, A&E sheetrocked and spackled the Princeton Basement project and shared photos of the progress we have made over the last few weeks. Since then, we have also installed the drop ceiling and put on the first layers of paint! Take a look at the progress we've made in just one week!

 
Storage Space
Last Week
 
 This Week


Laundry Space
Last Week


This Week


Stairs
Last Week


This Week  


A Look at the Entire Space
 
Carpet, tile and cabinets are scheduled to go in later today! Check back early next week for photos of the finished space!
 

Tuesday, July 16, 2013

Princeton Basement: Sheetrocking and Spackling

Two weeks ago, A&E introduced you to the Princeton Basement project that is taking place in the same home as the Princeton Kitchen Remodel that we completed just last year. Over the past 2 weeks, we have completed framing, sheetrocking and spackling, and are prepping to paint and install the flooring and cabinets!


July 3: The framed storage space.
July 16: Two views of the sheetrocked storage space, double doors into the storage space, soffit and column.
 
 
July 3: The framed laundry space and corner closet.
July 16: The sheetrocked laundry space with corner closet and door.


July 3: The framed stairs and closet under the stairs.
July 16: Two views of the framed stairs, closet space, soffit and column.


Later this week, we will be painting and adding the finishing touches! Check back soon to see the transformation!

Thursday, July 11, 2013

Finished Bathroom Renovation: Skillman, NJ

 
Over the holidays, A&E started and completed a master bathroom renovation in Skillman, NJ. Just a few days ago, we had a chance to visit the homeowner and photograph the space. Here, we show you the major changes to the floor plan and the finished space!


During the remodeling, a major goal was to fully utilize the space without making major changes to the existing layout. As seen above, the only changes in wall structure were the removal of the closet walls (to the right of the entryway) and the removal of the catty-corner behind the original vanity. These minor adjustments allowed us to move the vanity to a single wall and to add a cabinet fixture next to the toilet. The replacement of the corner tub with a freestanding tub freed up space, allowing the homeowners to enjoy a much larger shower.


Before.

After: a view into the new master bathroom.


Before.
 
After: the placement of the new tub allows it to receive natural light throughout the day. The choice of flooring (although it looks like hardwood, it's actually tile!) complements the color of the walls and makes the space feel warm and comfortable.


Before. 
The glass shower adds to the "light" feeling of the interior and the color of the shower tile matches that of the floor tile.

Wednesday, July 3, 2013

Princeton Basement

Do you remember our Princeton Kitchen Remodel From Start to Finish? Just last year, A&E completed a renovation for Princeton homeowners who wanted to enlarge their kitchen and update it with the most modern appliances. Today, we're back in the same home, although this time the homeowners are looking to finish their basement, complete with room for recreation, laundry and additional storage. Here's a glimpse of where we started, where we are and where we're going:


View from the Bottom of the Stairs

Where we started
Where we are (after framing)
Where we're going


View from the Stairs, Looking at the Storage Space

Where we started
Where we are (after framing)
Where we're going


Laundry Area

Where we started
Where we are (after framing)
 
 
Where we're going


View from the Laundry, Looking at the Stairs
Where we started
Where we are (after framing)
Where we're going


Final Plan
 
 
Stay tuned for pictures of the final result!